
I was admittedly late to the game when it comes to Animal Crossing. So late, in fact, that it seems odd to be giving advice to new-comers when I thought I was literally the last person to jump on the bandwagon. I also came to Animal Crossing: New Horizons with absolutely NO experience in past Animal Crossing games. There was absolutely a learning curve. So this is a collection of things I wish I’d known when I started and some tips to help you progress your island as quickly as possible.
Things You Can’t Change
- Your Name/Birthday – The game will warn you that you can’t change your name/birthday, which you enter when you first load the game.
- Your Starting Island Layout – You’ll see a series of random island layouts to choose from and they all have roughly the same amount of land/water. You will later unlock the ability to landscape, which will let you adjust the cliff levels and rivers/ponds on your island; however, you cannot change the river mouths. You also can never move the dock, airport, or resident services plaza, so pay attention to where these are more than the landscape when you make your choice.
- Your Airport Color – I know what you might be thinking here: why do I even care what color the airport is? Well, it will dictate the color of some other items that are available to you in your Nook Stop later. Check out this reddit post and infographic for more information on how airport colors impact other item colors. If you don’t like the color, you’ll have to start over to get it to reset. To reset your game, you need to return to the title screen and click the minus button on your left joy-con to open the Settings. This will take you to a screen where you’re talking to Tom Nook; choose to talk to him about “Save data” to delete your save file. You’ll get a warning because once you do this, there’s no going back.
- Native Fruit & Flower – Each island will have a single fruit and flower type that occur natively. You can acquire and plant other fruits and flowers from mystery islands, seeds, or friends. Your native fruit will always be available for purchase in your Nook’s Cranny and will, therefore, sell for less in your shop. These will also be the most common fruits and flowers that you’ll see when visiting mystery islands. Like with the Airport Color, if you don’t like what you get, you’ll need to delete the save file and start over until you get a combo you’re happy with. For example, if I could do it again, I probably would have reset until I got Pears and later set my town tune to the Genovia anthem (little Princess Diaries reference there).
- Your Island Name – You also can’t change your island name which will come slightly later—after you’ve landed on the island and met your starter villagers. I couldn’t think of anything clever, so I just named my island Kandiland (because my name is Kandi—real original, I know). Now I see all these clever island names and I hate mine, but it is what it is.
Basic Controls & Gameplay
The game doesn’t really give you a tutorial of any kind, so if you’ve never played any Animal Crossing games before, you just have to figure a lot out on your own. If you were lucky enough to get your hands on a copy of the official guide book, the controls and basic actions are outlined starting on page 8 (note: I noticed a mistake in how the Y button is labeled in the book). If, however, you were unable to get a copy (like most people), check out this graphic that I put together:

Basic Actions
The (A) button will be your go-to for more actions. Want to go in a building? Press (A) at the door. Want to talk to a villager or NPC? Press (A) while standing near them. Want to use a tool? Press (A) while it’s equipped. Want to smack a building/villager/friend? Press (A) while holding a net next to them! SUCH FUN! Need to harvest some fruit or get some sticks? Press (A) next to a tree to shake it. Just be warned that this could disturb wasps! I recommend always having a Net in hand when you shake trees.
If you want to sit or lay on furniture, just walk into it. In some cases, you can then use the left joystick to change which direction you’re facing. While walking, you can hold (B) to run. Just be careful not to run through flowers because it will destroy the buds and you’ll have to wait for them to regrow. When you see items on the ground, use the (Y) button to pick them up. The (Y) button is also used to kick dirt which can be used to remove designs from the ground or to fill in holes; using the kick option to fill in holes can help save the durability on your shovel! Note that if you have placed custom designs on the ground, it’s easy to kick them up by mistake. If you need to pick up items near custom paths, walk until you see the name of the dropped item on screen to be sure that you don’t kick up your design by mistake.
Money Spot
As you wander your island, you might find a glowing spot on the ground. You can’t do anything with this until you get a shovel. Once you do have a shovel, you can dig it up and get 1,000 bells, but don’t fill in the hole right away. The game doesn’t actually tell you right away what this is and that you can get even more money from it. Bury a bag of bells in the hole to create a money tree that will grow like a fruit tree and give you three bags of bells. There’s a bit of gambling involved here as far as how much you should bury. Below is a table of the odds (according to the official guide book, pg. 124).
| Amount Buried | Result |
|---|---|
| 1,000 bells or less | 100% chance of 1,000 bells x3 |
| 1,001-9,999 bells | 30% chance of amount buried x3 70% change of 1,000 bells x3 |
| 10,000 bells or more | 30% chance of amount buried x3 70% chance of 10,000 bells x3 |
This means you could plant 99k bells, but there’s a 70% chance you’ll lose bells and only get 30k total back. If you plant 10k each time, you’re always guaranteed to get 30k and gain money. If you want to get more and still minimize risk, you can plant 30k each time; sometimes you’ll get lucky and harvest 90k but most of the time you’ll just get the same 30k back again.
How to Best Spend Nook Miles
There are certain items in the game that can only be gained using Nook Miles, the most obvious of these being the Nook Mile Tickets (NMT) that are used to travel to mystery islands. You can also use them to get more hair styles/colors, which might seem like a priority at first, but trust me it’s not. The most annoying problem you’ll run into when you first begin playing, is quick access to your tools and pocket space. To start with, you’ll only get 20 spaces in your pockets and nearly half of that will be used up by tools. The first place you should spend your money is on upgrading your pocket. That will take you to 30. The next upgrade is more expensive and will take you to 40 spaces. I recommend buying the first pocket upgrade and the tool ring first, then the final pocket upgrade.
It’s also worth the Nook Miles to buy the upgraded tools recipes as early as possible. Tools breaking will become very annoying very quickly. Flimsy tools don’t last long and in the beginning you don’t have the extra money to buy tools every time they break so you’ll spend a lot of time crafting tools to use to get the resources you need to craft more tools. It’s an endless cycle.
Crossing Rivers & Reaching Cliffs
You’ll need a pole vault and a ladder to reach all areas of your island and mystery islands that you visit. Unfortunately, you don’t get these tools right away. If you have friends that play, see if they’d be willing to send you these tools so you can take advantage of all the resources on mystery islands. Don’t know anyone who plays? Join our stream and/or discord and let us know. We’ll hook you up.
Talk to Your Villagers
You want to talk to villagers as much as possible for a couple of reasons. First, you’ll build up your friendship levels with them. There are Nook Mile objectives for having “True Friends” status with your villagers. Pay attention to what they say to you, because they will often give you hints about things you can do on the island. For example, the money spot. You might have already found one and potentially filled it in and missed out on a money tree before they mention it, but they may give you similar ideas. Also, they say really silly things sometimes and it’s cute as fuck.

Choosing Villagers
Eventually, Tom Nook will let you purchase additional housing plots for your island so you can recruit more villagers to come live on the island. You should only buy one plot at a time if you’re looking for specific villagers, because if you leave a plot empty overnight, a random villager will be moved in without your approval and you don’t want to end up with some serious nightmare fuel—don’t even get me started on the Octopi villagers. That’s how I ended up with this weirdo and I can’t wait for her to leave:

You can go find villagers a couple of ways. First, if you have friends that play and they have a villager “in boxes,” that means the villager is looking to move off their island and you can invite them to your own. If you search online, you can find threads where people are offering up their villagers that are in boxes. Be aware that some people will ask you for NMTs and/or Bells in exchange and there are some that will try to cheat/scam you. I recommend just looking for people offering villagers up for free.
You can also visit mystery islands to find villagers. Tom Nook will initially prompt you to find 3 new residents which you’ll need to help build furniture for. When I first did this, I just invited the first 3 villagers I found on my mystery islands, not realizing how difficult it’d be to change them later. As long as you have an empty plot, there will be a random villager on each mystery island you visit. Just keep visiting more islands until you find villagers you actually like. Running out of NMTs? Check out giveaway streams or ask for help from friends.
A Note About Dreamies
“Dreamies” are what people call their ideal villagers that they want to keep on their island forever. Some people choose their Dreamies because of how cute they are or for their personality or even because of their houses. The first five villagers on your island—the two that arrive with you and the first 3 you invite—will have very basic houses which aren’t fully themed to the character. All villagers that arrive after that will have their upgraded houses. So if you care about how their house looks, you might want to hold off and not invite a Dreamie as one of your first 5 villagers.
Catching Creatures
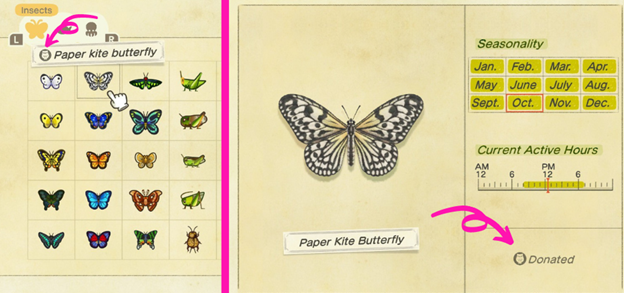
You can catch bugs, fish, and sea creatures which can be donated to the museum and/or sold for money. You won’t have a museum right away, but go ahead and start saving anything you catch. Critters can be stored in your house or placed on the island. If you still have just a tent, you won’t have storage yet and once you get your house, you’ll notice the storage fills up fast.
Always donate the first of each creature you catch to the museum so you can complete it faster. You can easily see which critters are already in the museum by checking the Critterpedia app on your NookPhone.
After donating the first of each bug, you can start selling them for bells. You can sell Critters to Nook’s Cranny, but you’ll make even more money if you wait for Flick and CJ to come to your island. Flick will pay double for bugs and CJ will pay double for fish. You can also commission models of bugs or fish to display around your island! You’ll need three of whatever critter you want a model of. You can request bug models while Flick is visiting and fish models while CJ is visiting.
Go ahead and just sell Sea Creatures at Nook’s Cranny. Currently, you can’t get models of them and there are no NPCs that pay extra for them. For more details on how to catch Critters, see our other guides:
- Tips for Catching Fish & Becoming a Cast Master
- Animal Crossing: New Horizons – Wasps!
- Animal Crossing: New Horizons – Scorpions! (also applies to Tarantulas)
Music
There are different items in the game that can be used to play music. By default, you’ll get a Portable Radio, which plays K.K. Slider songs at random. Other items will let you register and play specific songs, or shuffle your music library. Music can be purchased through the Nook Shopping app at the Nook Stop in Resident Services. Each day, different music will be available.
After you progress through the main storyline, K.K. Slider will come to your island for a concert and will then show up every weekend. During concerts, you can request songs from K.K. Requests can be random, by mood, or by title. There are some songs that you can only get by requesting it specifically by title!
In your pocket, songs will show up as a music note. While in your house, you will see an option to “Hang on Wall” which will display the album cover as wall art, but this doesn’t add it to your music library. Approach an item used to play music (Jukebox, Tape Deck, Phonograph, etc) and choose the “Register” option. Choose music from your pocket and it will be added to your library. You can remove it later if you don’t like it and don’t want it to play. Use the plus/minus (+/-) buttons to adjust the volume and choose which song you want to listen to. You can also set it to shuffle through your entire library.
